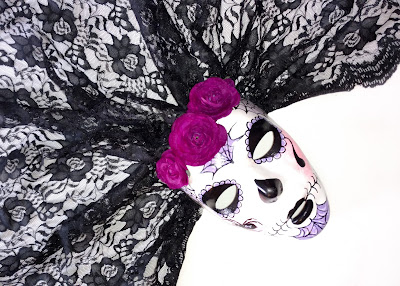
While shopping a few weeks ago, I came across a flimsy Day of the Dead mask with an attached veil. I liked the concept of the piece, but I wasn't impressed with the execution. I wanted to make a mask using some of the skills I have developed over the years painting on canvas. I knew I had a blank white mask at home, as well as a section of black lace fabric. The rest of the build is pretty much just paint. The only item I had to purchase is the purple flowers attached at the very end.
My first step was to give the whole mask a flesh-tone paint job. I know most people think this is a wasted step, but I wanted the mask to look more like face paint than a Halloween mask. In order to give the white mask a flesh tone I used a sponge to apply a coat of acrylic paint followed by rosy cheeks and red lips. For my flesh tone I used Burnt Sienna thinned with Titanium White. I allowed some parts to remain darker to give more dimension to the flesh color. Grumbacher Red was used full strength for the lips and thinned with Titanium White for the blush color on the cheeks.
After I achieved a modeled flesh tone for the entire mask, I took a clean sponge and lightly applied Titanium White paint over the majority of the mask. I didn't want it to look like it was brushed on, and dabbing the sponge across the surface mimics the texture of flesh. I didn't take the white completely to the edges, I wanted it to look as if someone was painting their own face and happened to miss a few spots, or at least didn't cover their face completely with white.
Once the white layer dried, I applied another layer of blush by thinning Grumbacher Red with Titanium white. I kept it spotty on the cheeks and didn't completely cover the lips, but wanted a touch of the color to possibly show through once the final layers were applied.
I neglected to document the sketch stage of the final design. I used water-color pencils to mark out the lines of the spider web designs on the forehead, temples, and chin. I laid out the flower petal design around both eyes, mocked up the spider and the lines extending from the mouth. I used a fine line paintbrush and painted all the black lines first, then came back and filled in the body of those shapes. I thinned Dioxazine Purple with Titanium White for the darker purples, and once those shapes were filled, I wanted to give them more depth and so I thinned the purple even further and touched up the shapes with subtle highlights.
I pre-drilled sewing holes in the rim of the mask before painting. Those holes were integral in sewing the lace to the mask. I could have simply used hot-glue to attach the fabric, but I wanted to make sure it was going to hold up for a long time. I bunched up about six inches of lace and stitched it to itself using upholstery thread for strength before threading it through the holes in the mask. I gathered approximately four inches of fabric together for each hole set in the mask. Once the lace was attached, I dis-assembled the purple flowers from their stems and used hot-glue to attach each of them to the forehead of the mask. Once the decorative painting was complete, I allowed it to dry over night and then sprayed the entire mask with a clear spray paint to seal it and protect it from damage or flaking.
It may be difficult to see in this image, but I also attached a miniature top hat to the rim of the mask. I hot-glued the one remaining purple flower to the brim of the hat before stitching it to the mask through the existing holes as well as through the lace.
The last thing I needed was someone to model the mask for me. Lucky for me Kahlan was more than willing to wear this mask during a recent photo session with me.
There are more images from this session
:: WARNING ::
This post includes nudity and is Not Safe For Work
Thank you for taking the time to view and appreciate my photography
I am always looking for models to collaborate on new ideas
I am currently located in Aztec, NM, USA


No comments:
Post a Comment
Please feel free to leave feedback but be respectful to my models